ㅤ
Types of Problems and How to Fix Them
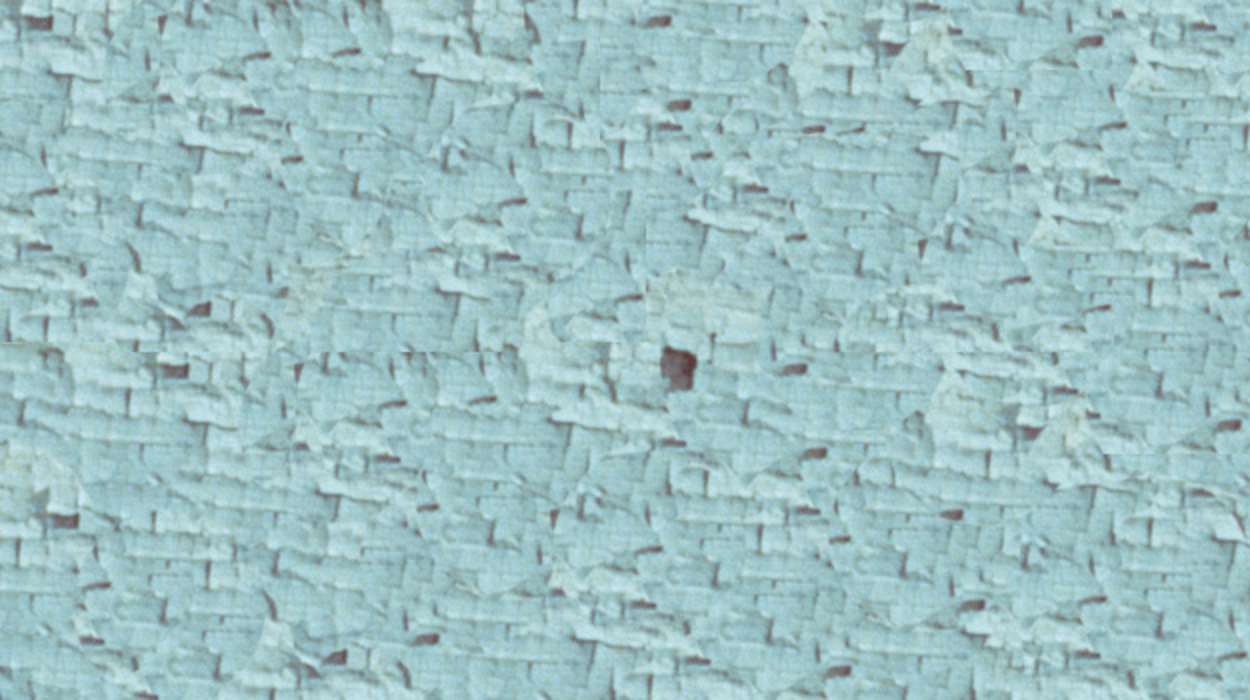
Delamination
Delamination is the cracking and eventual peeling of paint from the surface of a plywood or composition wood substrate. Plywood cracks from its expansion and contraction with changes in moisture and temperature. Plywood is prone to cracking because of its original construction from thin sheets of wood.
POSSIBLE CAUSES
- Wet wood swells, causing wood fibers to loosen, crack and fall off, taking all coatings with them. Moisture can seep behind paint films and absorb into the wood due to poor construction, poor or no caulking, lack of venting or sealing of the wood.
- Pinholes in the paint film can also allow moisture behind the paint film, causing delamination.
SOLUTION
To prevent cracking of newly installed plywood, you can sand and prime it with a latex primer. If severe cracking has occurred, you’ll need to replace the wood – it can’t be repainted.
If cracking is not extensive, remove all loose and peeling paint (power washing may be necessary for larger areas). Find and eliminate the source of moisture. Clean the surface thoroughly with a bleach-and-water solution. Damaged or rough surfaces may need to be sanded to fresh wood. Remove dust and allow to dry thoroughly. Seal all bare wood with an oil/alkyd primer followed by the desired topcoat.
ㅤ
ㅤ
Due to Moisture (Exterior)
Exterior finishes can peel due to moisture, resulting the loss of exterior paint adhesion and often exposing the bare surface.
POSSIBLE CAUSES
- Peeling paint results when a wet surface swells, causing the paint film to loosen, crack and fall off. Water may seep under the paint film in many ways, including:
- Worn-out joints or lack of caulking in joints, corners and openings can allow moisture to enter.
- Clogging of gutters by ice dams or debris causes moisture to penetrate under roof shingles.
- Interior moisture migrates through to the exterior walls.
- Painted surfaces are too close to bare ground.
- Leaking roofs.
- Painting a surface that is damp with rain, condensation or dew.
SOLUTION
Remove loose or cracked caulking and peeling paint and repair with a quality product.
Clean and repair gutters so they properly channel water away from the house. Be sure roof is vented and insulated properly to prevent ice dams and repair as needed.
Install vents, louvers, fans and dehumidifiers to reduce moisture, especially in the kitchen, bathroom and laundry areas.
If wood siding is touching the ground, remove that portion of the wood. Siding should be installed no less than 6" above the ground.
Remove all loose peeling paint and sand any rough edges smooth. Sand to remove loose wood fibers if present. Make sure surface is clean, dull and dry. Prime with appropriate primer and recoat with good-quality paint.
ㅤ
Due to Moisture (Interior)
Peeling due to moisture occurs when there’s a loss of paint adhesion caused by high levels of moisture, which penetrates paint film and eventually pushes film away from the surface.
POSSIBLE CAUSES
- Peeling paint results when a wet surface swells, causing the paint film to loosen, crack and fall off. Water may seep under the paint film in many ways, including:
- Excessive moisture in the home, resulting from cooking, showering, laundering or the use of a humidifier, vaporizer or hot tub.
- Excessive moisture is present due to high levels of humidity in the basement or foundation.
SOLUTION
Proper ventilation can fix most interior moisture problems. Install exhaust fans in high-moisture areas, such as kitchens or bathrooms with showers, to carry moisture-laden air outdoors.
Proper ventilation in the walls and/or roof of the home may be necessary. Heavily insulated and sealed homes need a way for moisture to escape, such as through roof vents or outside wall vents. Allowing moisture to escape via open windows is an option.
If high levels of moisture/humidity exist in a basement, the cause of this must be determined and eliminated.
Once proper ventilation has been installed, peeling paint should be removed, and the underlying surface cleaned and primed. Test the coating in a 6" to 12" radius around any peeled areas to be sure its adhesion is adequate. Follow label directions for proper surface preparation.
ㅤ
On Concrete Floors
Peeling on concrete floors occurs when paint adhesion is lost, and the loose paint starts peeling off in single or multiple coats.
POSSIBLE CAUSES
- Lack of preparation before painting. Grease, oil, wax and dirt tend to soak in and are difficult to remove from concrete.
- Failure to acid etch a smooth concrete floor before painting.
- Hardeners added to concrete will often prevent good adhesion because they prevent the paint or stain from penetrating into the surface.
- Concrete contains alkali which may be drawn to the surface by water. When the water evaporates the alkali leave a crystallized substance called efflorescence, which pushes against the paint film and causes peeling. If there is no moisture barrier under the concrete, moisture can easily seep through.
- Old concrete may crumble, taking the paint film along with it.
- An alkyd or oil-based floor finish is applied to an uncured concrete floor. When alkyd resins come in contact with the alkaline concrete surface, they combine, react with one another and form a soap film between them. This is called saponification and results in extremely poor adhesion and softness of the alkyd coating.
SOLUTION
First, remove all peeling paint by scraping or using a chemical stripper. Power washing is recommended for large areas. To clean the floor, scrub with hot water and a strong detergent or degreaser. Avoid mild dishwashing detergents; they contain skin-softening ingredients that may leave a residue on the surface. Rinse thoroughly and allow the surface to dry for several days. Stubborn grease may continue to rise to the surface and may require additional cleaning.
Once the floor is clean and dry, acid etching is recommended using a 10% solution of muriatic acid and water. ALWAYS MIX THE ACID INTO THE WATER, NOT THE WATER INTO THE ACID. There are also phosphoric and citric acids that are much milder and recommended for indoor use. Allow the solution to remain on the surface for 10 to 15 minutes until all bubbling ceases. Flush the surface with clean water and allow it to dry completely for 2-3 days. Follow with the desired paint.
When the floor is properly etched, it should resemble the texture of 120-grit sandpaper. Etching neutralizes the surface and provides a better bond. It also halts saponification and efflorescence and balances the pH level of the surface.
ㅤ
On Wood Floors
Peeling on wood floors occurs when paint adhesion fails and loose paint starts peeling off in single or multiple coats.
POSSIBLE CAUSES
- Poor surface preparation.
- Painting over a surface containing wax.
- Painting over an old, smooth coating.
- Painting over chalky surfaces.
- Buildup of moisture within the wood.
SOLUTION
Proper surface preparation will help prevent peeling of the paint topcoat. Scrape and sand to remove all peeling paint. Sand glossy surfaces to dull. To remove a wax residue on the surface, use TSP or degreaser. Power washing is recommended for large areas. Allow wood to dry 48 hours and repaint.
Identify and eliminate causes of moisture. Thoroughly clean the surface as above and allow to dry 48 hours and repaint.
ㅤ
On a Hard or Slick Surface
Peeling occurs on hard or slick surfaces when paint adhesion is lost and loose paint starts peeling off in single or multiple coats.
POSSIBLE CAUSES
- The most common causes are lack of curing time after painting and poor surface preparation. Although most quality latex paints dry very quickly, the hardening or curing process takes much longer, from 2 to 4 weeks. During the curing period, latex paints are very susceptible to damage by abrasion or scratching. When the surface is properly prepared, sufficient curing time is all that’s needed for a satisfactory job. On some surfaces, special preparation is necessary, or failure of the topcoat can occur.
SOLUTION
Prior to painting, all surfaces must be clean and free of wax, grease or dirt. All glossy surfaces need to be dulled by sanding (there are other methods of dulling a glossy surface, such as liquid sandpaper).
If the old surface is still hard and slick, an appropriate undercoat, as recommended by the manufacturer, should be applied. Oil-based primers will bond better to slick surfaces.
An application that requires a quicker cure time works best if a quality alkyd enamel is used. It is still important to allow enough time for curing, even with the best preparation and application.
ㅤ
On Galvanized Metal
Peeling occurs on galvanized metal when paint adhesion is lost and the loose paint starts peeling off in single or multiple coats.
POSSIBLE CAUSES
- As a rule, paints don’t adhere well to smooth metal surfaces. Peeling from metal may be the result of failure to remove rust, not painting immediately after cleaning, or failure to use a primer when needed.
- Galvanized metals are not only smooth, but the metal is also coated with a thin layer of oil to prevent white rust. Painting over galvanized metal without removing the protective layer of oil causes very slow curing of the paint and results in wrinkling and peeling.
SOLUTION
If rust is present, use a wire brush and sandpaper to remove as much peeling paint and rust as possible. If the rusting is severe and cannot all be removed, apply a rust-converting coating, working it into the cracks, followed by a topcoat with a latex paint.
For galvanized metal, the protective layer of oil must be completely removed. Solvent wiping (mineral spirits, lacquer thinner, etc.) is recommended. Weathered galvanized metal develops a layer of "white rust" which must be removed by wire brushing and sanding. Thoroughly remove all dust, then wipe with solvent and topcoat with latex paint or a direct-to-metal primer/finish.
Single Coat vs. Multi Coat
Single-Coat Peeling
DESCRIPTION
Single-coat paint peeling is when only the topmost layer of paint peels from the surface. This can happen both in both interior and exterior applications.
POSSIBLE CAUSES
- Lack of proper surface preparation.
- Applying paint over chalky, dirty surfaces.
- Applying paint over glossy or tightly sealed surfaces without enough "tooth" to permit good bonding.
SOLUTION
Prior to painting, all surfaces must be clean and free of wax, grease or dirt. All glossy surfaces need to be dulled by sanding (there are other methods of dulling a glossy surface, such as liquid sandpaper).
If the old surface is still hard and slick, an appropriate undercoat, as recommended by the manufacturer, should be applied. Oil-based primers will bond better to slick surfaces.
An application that requires a quicker cure time works best if a quality alkyd enamel is used. It is still important to allow enough time for curing even with the best preparation and application.
Multi-Coat Peeling
DESCRIPTION
With multi-coat peeling, multiple layers of paint, not just the topcoat, are peeling from a surface.
POSSIBLE CAUSES
- Delamination or breakdown of the substrate (usually wood or plywood).
- Moisture penetrating beneath the paint film. This can happen if there are no vents installed outside the home, inadequate attic and roof ventilation, a wet or damp foundation, an uncovered crawl space or untrimmed shrubbery resting against the siding. Poorly vented kitchens, bathrooms and laundry rooms can also cause a problem because unvented moisture can migrate through walls.
- Older, more brittle coats of paint underneath cannot withstand the repeated expansion and contraction as temperature and humidity change.
SOLUTION
Install vents, ventilating holes and/or louvers as needed. Vent bathrooms, clothes dryers and gas space heaters to exhaust moisture to the outside of the house. Waterproof interior basement walls to prevent transmission of moisture to siding from surrounding wet or damp ground. Waterproof exterior foundation below ground level with tar or asphalt coating; trim shrubbery to provide ventilation. Cover crawl space ground area with barrier of roofing material or heavy polyethylene plastic sheeting.
Remove all peeling paint and sand rough edges smooth. Sand to remove loose wood fibers if present. Make sure surface is clean, dull and dry. Prime with appropriate primer and recoat with a high-quality paint.